Creative Cloud Exposures

A couple weeks ago I shared all about photographing creative exposures of water and last week I offered thoughts on choosing a neutral density filter for various long exposure effects. So today I’m sharing all about creative long exposures of clouds. One of my favorite things to do on a day with pretty clouds is experiment with shutter speed for wispy cloud movement. Now, this is not to say that I don’t love an image of gorgeous clouds with a faster shutter speed, because I do.

1/160 Shutter Speed

1/160 Shutter Speed

But it is a lot of fun to grab my 10 stop Neutral Density filter and shoot exposures with shutter speeds of 30 seconds and longer. As mentioned in last week’s post, if the clouds are moving fast, a shutter speed of 15 seconds may get some movement, but most often if I am shooting for cloud movement, my shutter speed will be 30 seconds to several minutes.

Below is a sample of 3 exposures, the first a faster shutter speed showing the clouds as we see them, the second one is 60 seconds and the third is 120 seconds. You can see dramatically more cloud movement from the first to the second and somewhat more cloud movement from the second to the third image.

1/13 Second Exposure

1/13 Second Exposure

60 Second Exposure

60 Second Exposure

120 Second Exposure

120 Second Exposure

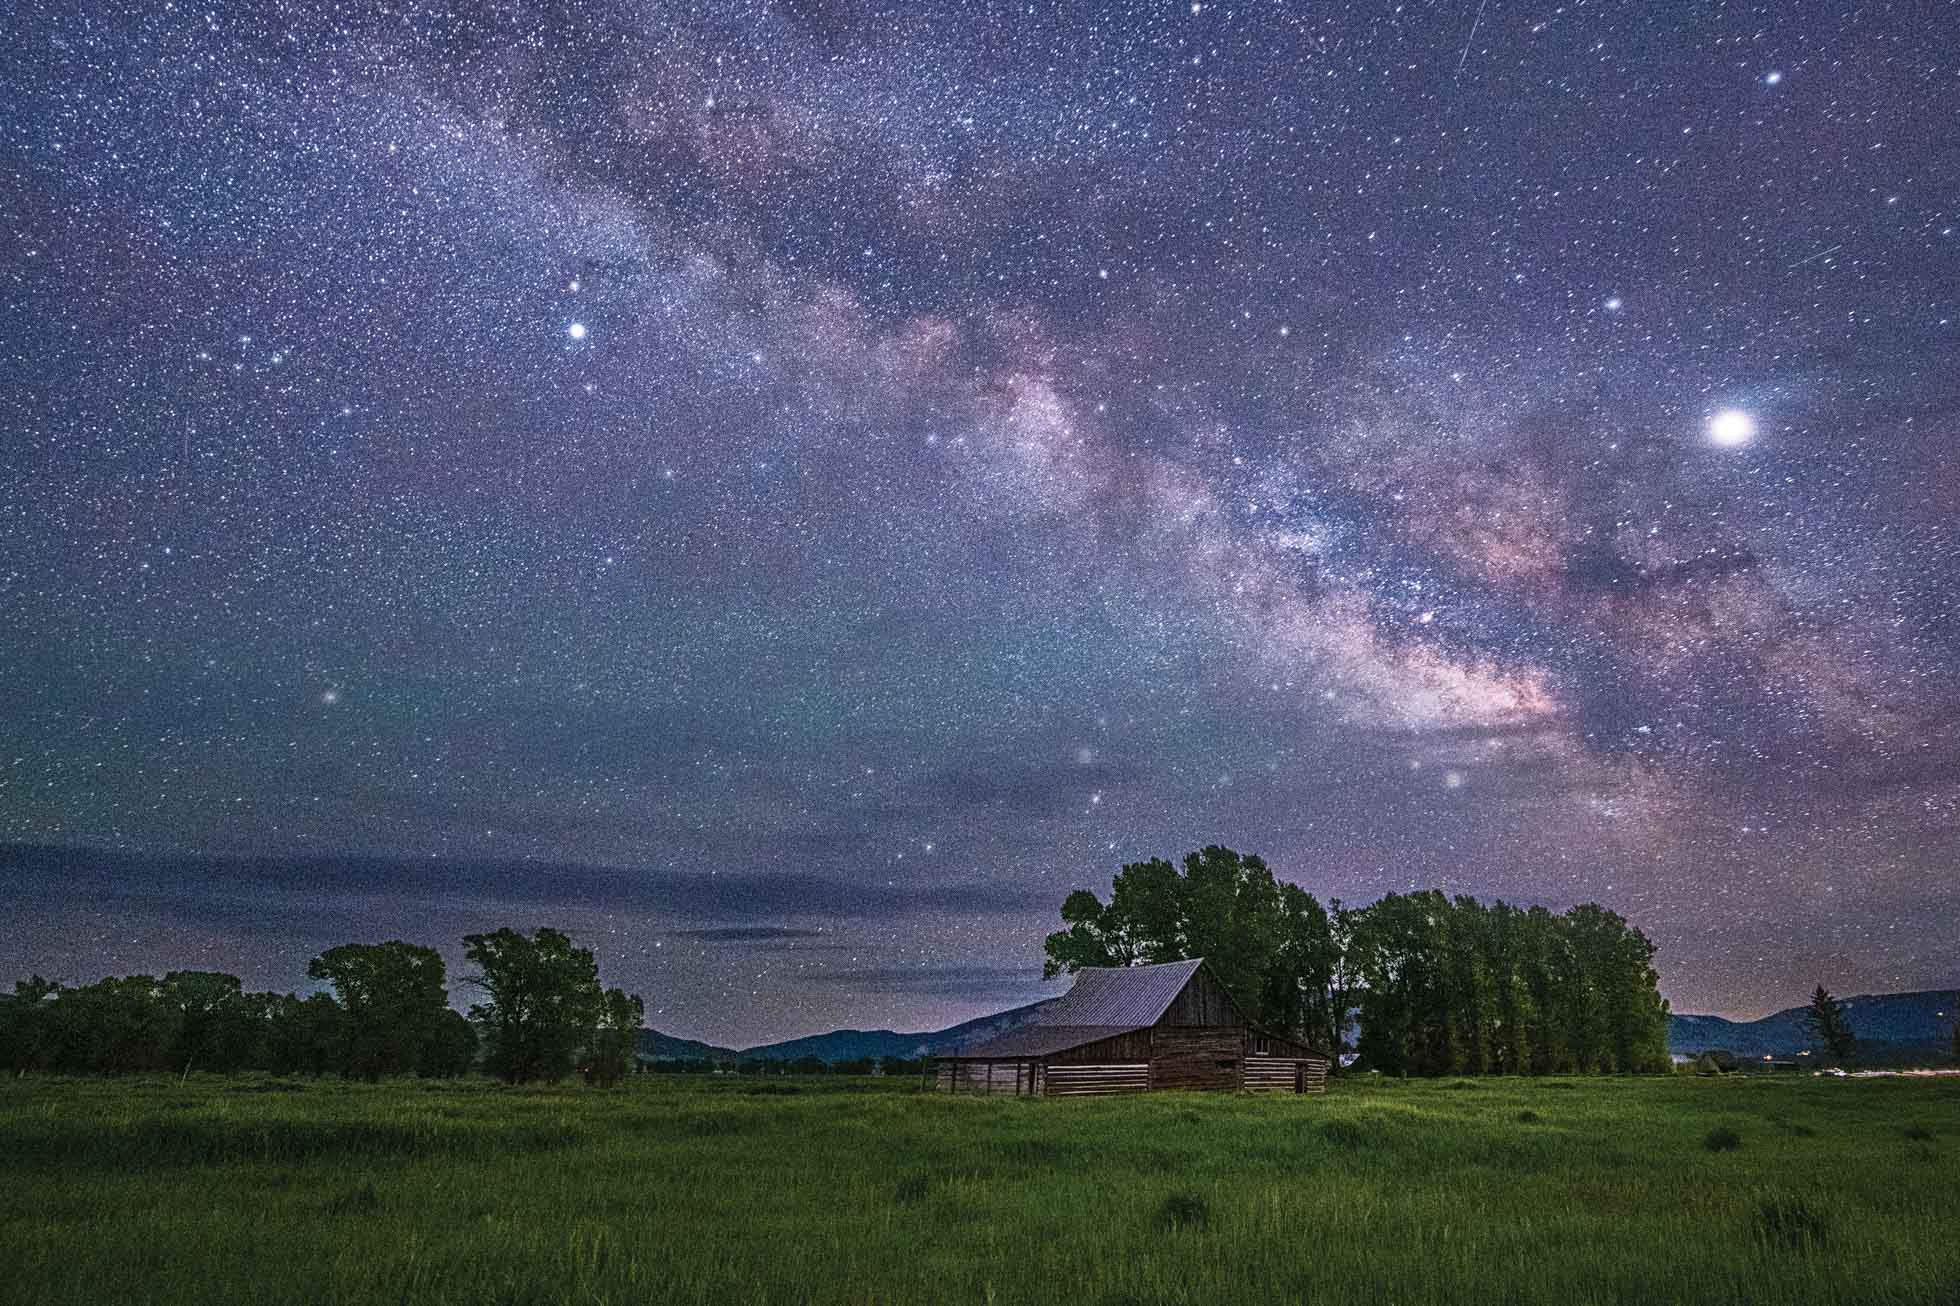
The following images are more examples of long exposures to show cloud movement. Exposure times are listed in the captions.

3 Minute Exposure

3 Minute Exposure

2 Minute Exposure

2 Minute Exposure

1 Minute Exposure

1 Minute Exposure

6 Minute Exposure

6 Minute Exposure

To experiment with exposures 30 seconds and longer, I encourage you to invest in a 10 stop Neutral Density Filter and perhaps also a 15 stop filter. My favorite filters are from Breakthrough Photography *.

And don’t forget to find your focus and composition before putting on the 10 or 15 stop filter and cover the viewfinder with a black cloth to prevent light leaks! For more tips on long exposures check out 9 Tips for Creative Long Exposures. Have fun shooting long exposures of the clouds!


Kristen Ryan is a landscape and fine art photographer residing in the Midwest suburbs of Chicago. All images can be purchased in the Fine Art Store. Kristen leads ladies landscape photography retreats in the TetonsChicago, and the Canadian Rockies, offers private mentoring and teaches an online landscape photography workshop twice a year.

Did you know that The World Around You is now open for registration for the October 7, 2019 run?! Join me for a month of exploring the scenery around you and learn to capture stunning landscape imagery at home and in your travels.

*Affiliate Link

Photographing Water With Creative Exposures

When first learning to shoot in manual mode, we learn that aperture, ISO and shutter speed create the exposure triangle. If we change one of these settings, we then have to alter another one to achieve proper exposure. In the beginning, when I was learning the exposure triangle, I was shooting more portraits of my kids and loving the beautiful blur that came from wide open apertures. In creating this blur and bokeh, my shutter speed was typically fast to counterbalance the wide apertures in the exposure triangle.

Over time and especially as I fell in love with landscape photography, I learned to consider shutter speed as not only a part of the exposure triangle and important in freezing the motion of my fast moving toddlers, but as a creative choice. In fact, creative shutter speed use is one of my favorite techniques when shooting moving water within a landscape.

There are 3 main choices when it comes to using shutter speed to capture water: 1) A fast shutter speed used to freeze the motion of the water and maintain texture. 2) A slower shutter speed in the range of say .4 seconds - 3 seconds which will smooth the water a bit but maintain some texture and shape and 3) a very slow shutter speed of at least 5 seconds or longer that will smooth the water completely and create a dreamy quality. Each of these exposure times creates a different texture of the water and mood in the overall image.

Chicago Skyline on a windy and wavy day. Captured with a 1/320 shutter speed.

Chicago Skyline on a windy and wavy day. Captured with a 1/320 shutter speed.

1) Fast Shutter Speed - The image above was captured on a very windy day in Chicago and the waves were crashing hard along the pavement below the steps outside Adler Planetarium. The fast shutter speed freezes the motion of the waves and shows the texture of the water. This exposure choice allows the viewer to see the rough water and feel the mood of the scene captured.

1 second exposure of the rough waves on a windy day in Chicago!

1 second exposure of the rough waves on a windy day in Chicago!

2) Slow shutter speed in the .4 second to 3 second range. This choice of exposure does not freeze the motion of the water and creates a smoother effect than a fast shutter speed. The blur of the movement still maintains some texture in the water and shape in the waves. This choice also maintains a bit of the actual mood of the windy and wavy scene but also adds a creative effect. A shutter speed in this range will typically require the use of a Neutral Density filter unless shot in very low light. This image was captured using a 6 stop Neutral Density filter from Breakthrough Photography *.

60 second exposure after the sun dipped below the horizon

60 second exposure after the sun dipped below the horizon

3) Long Exposure 5 seconds or more. These exposure times will smooth out the movement of the water and the longer exposures (15 seconds+) will create a dreamy and serene feel in the image. This moment felt very serene standing on the shores of Lake Michigan watching the beautiful sunset colors light up the sky. While the image does not show the rough waters that existed, it does represent my mood as I captured the scene. Sometimes creative exposures capture how we feel even if the scene appeared a bit different in reality.

Longer exposures in the range of 5 seconds to minutes require the use of a Neutral Density filter except when shooting in the dark. This 60 second exposure also used a 6 stop Neutral Density filter from Breakthrough Photography.* Quite often, exposures of this length will need a 10 stop ND filter.


Kristen Ryan is a landscape and fine art photographer residing in the Midwest suburbs of Chicago. All images can be purchased in the Fine Art Store. Kristen leads ladies landscape photography retreats in the TetonsChicago, and the Canadian Rockies, offers private mentoring and teaches an online landscape photography workshop twice a year.

*Affiliate Link

9 More Tips for Astrophotography (Part 2)

My last blog post, toward the end of June, shared tips for Astrophotography. Summer travel and family life occupied all my time in the last month and a half, but as promised, here is part 2 with 9 more tips for shooting those starry night skies!

1) Check the Moon Phase calendar when planning your Astrophotography. The less moonlight, the more stars you will see and the brighter the Milky Way will be. New Moon will be the darkest time of the month. This is when there is no moonlight at all. During other moon phases, you may still be able to shoot the stars and Milky Way without moon interference, but you’ll need to check the moonrise and moonset times. I love to use the Sun Surveyor app to find out the moon phase plus rise and set times. Sun Surveyor also gives the times the Milky Way core will rise and set and when it is visible without moon interference in your location. I highly recommend checking out this helpful app.

2) Use an app like Photopills to plan your Milky Way shooting. Photopills will help you to find out where the Milky Way will be located at any time in any location. At home or away, you can put the pin on any location and see where the Milky Way will be at midnight, 1:00 a.m, 3:00 a.m., etc. For this June’s Teton Retreat, I had our 2:00 a.m. String Lake Milky Way shoot planned when I chose the dates of the retreat knowing the Milky Way would be in the ideal position from 2:00-3:00 a.m. Using an app such as Photopills allows you to know what to expect and plan for success.

Milky Way over the Grand Teton at String Lake in June 2019 at the Magic in the Tetons Retreat

Milky Way over the Grand Teton at String Lake in June 2019 at the Magic in the Tetons Retreat

3) Get To Know Your Gear In The Dark - The very dark skies are great for capturing millions of stars, but this also means you can’t see your gear without a flashlight. If you are shooting with a friend or a group, turning on flashlights can ruin the exposures of your fellow photographers. Being able to put your camera on your tripod in the dark, adjust your tripod and check your LCD without turning on your flashlight is extremely helpful. Additionally, the longer you keep lights off, the more your eyes adjust to the dark.

4) Watch Your Histogram & Expose To The Right - In evaluating your exposure, check your histogram rather than relying on your LCD screen. Exposing as bright as you can without blowing the highlights will produce the best quality image with the least noise. Noise is inevitable in the dark conditions with high ISO. The better exposure you have, the less noise there will be. Check to see that your histogram is as far toward the right as it can be without it climbing up the right wall. There will be more tones toward the left because it is so dark, but keeping them as far as possible off the left wall of the histogram will capture a better quality image.

5) Consider Foreground Exposure - The foreground of your scene will be much darker than the sky full of stars. There are a couple options for getting a well exposed foreground image to composite with a great exposure of the sky. The first is to get out before the sun sets and capture the frame you want with a well exposed foreground before sunset or during blue hour when a little more light will light the scene. Be sure to choose your composition and leave the frame and focus where it is before shooting the night sky. The second option depending on the foreground scene is to light the foreground with a flashlight or headlamp. The foreground will need to be close enough, and your light strong enough, to be lit with your supplemental light source. Light painting must also be allowed where you are shooting. Grand Teton National Park, for example, does not allow light painting so during my retreats we do not light the foreground. The third option, if you arrive in the dark, is to take a brighter exposure of the foreground to composite with the sky by taking a longer exposure. This will create star trails in the sky, but you can composite your longer foreground exposure with your static star exposure in Photoshop.

A starry evening at the Three Sisters in Canmore, Alberta Canada

A starry evening at the Three Sisters in Canmore, Alberta Canada

6) Consider Stacking to Reduce Noise - One technique to try for less noise in astrophotography is taking multiple exposures of the same frame and stacking them in a program called Starry Landscape Stacker. This program is very easy to use and stacks multiple exposures of the sky into one by lining up the sky. The resulting image has less noise than editing one single exposure. For example, you can capture 10 exposures at ISO 6400, f/2.8, 15 seconds and stack them in Starry Landscape Stacker. The program is $40 but very worth it!

7) Consider Composition - Just as with landscape images, composition matters in astrophotography too. It can be easier to find a pleasing composition in the daylight, so it can be helpful to scout out a location ahead of time, or get there before dark as mentioned above in the Foreground Exposure tip. Even in daylight, you can use your Photopills app to see where the Milky Way will be in the Night AR part of the app so if you will be shooting the Milky Way, you can think about composition ahead of time. Consider where other aspects of the scene may be comfortably placed in the frame and how you can create balance between the left and right sides of the frame as well as the top and bottom.

8) Look for Interesting Foreground - As you consider composition, look for a location that will have interesting foreground to be part of the scene. Mountain peaks, rock formations, barns, trees, and oceans all are examples of foreground spaces that will add impact to your night sky images.

Milky Way over the Moulton Barn in Jackson Hole, Wyoming at the June 2019 Magic in the Tetons Retreat

Milky Way over the Moulton Barn in Jackson Hole, Wyoming at the June 2019 Magic in the Tetons Retreat

9) Pack Extra Batteries - A final gear recommendation for shooting astrophotography is to make sure to have at least 1 or 2 extra batteries. With (often) cooler temperatures and long exposures, batteries drain more quickly and it is disappointing to be capturing amazing images only to be thwarted by a dead camera battery! Make sure to head out prepared.

It can be challenging to get out to shoot at night, especially when it means giving up your sleep, but I promise it is worth it when you see the Milky Way on the LCD, or even just some beautiful stars!


Kristen Ryan is a landscape and fine art photographer residing in the Midwest suburbs of Chicago. All images can be purchased in the Fine Art Store. Kristen leads ladies landscape photography retreats in the TetonsChicago, and the Canadian Rockies, offers private mentoring and teaches an online landscape photography workshop twice a year.

9 Tips for Creative Long Exposures

One of my very favorite things to do when shooting nature and landscapes is to experiment with long exposures   Anytime I have the opportunity to get a creative exposure of clouds or water, I try to take it.

60 seconds in Grand Teton National Park - using a 10 stop filter.

60 seconds in Grand Teton National Park - using a 10 stop filter.

Here are some tips to help you find success when experimenting with long exposures:

1)  A tripod is your best friend.  I know, I know, they are cumbersome and a pain to carry but are necessary so that you can keep your frame stable throughout the long exposure.  Make sure your tripod is steady and secure. 

2) Invest in good Neutral Density Filters. I recommend a 6 stop and/or 10 stop ND filter. In brighter light and to get 30 second or longer exposures, you will often need a 10 stop filter. In lower light and/or an exposure of just a couple seconds, a 6 stop filter may be sufficient. For even longer exposures in daylight you can use a 15 stop filter as well. There are many companies that make Neutral Density Filters in various price ranges.

4 seconds at Natural Bridge in Yoho National Park - using a 6 stop filter.

4 seconds at Natural Bridge in Yoho National Park - using a 6 stop filter.

3)  Compose your frame and focus for the desired depth of field BEFORE putting the filter in front of the lens. Once you put a 10 stop filter on,  you can't see through to focus and compose. 

4) Set the new exposure BEFORE putting the filter on the lens. Find your proper exposure without the filter on.  Then you can use a Long Exposure Calculator App to find the new shutter speed after you put on the filter. Usually you will need to max out your ISO and aperture unless you are shooting in really low light.  For example, say I set my ISO to 100 and aperture to f/22 and my base shutter speed is 1/80.  If I enter into the app a 1/80 shutter speed and tell it I am using a 10 stop filter, the app will then tell me that a 13 second shutter speed will give me the same exposure with the filter on.  So then I will change my shutter speed to 13 seconds before I put on the filter.  The less I touch my camera after putting on the filter, the better. 

4 minute exposure using a 15 stop ND filter in Grand Teton National Park.

4 minute exposure using a 15 stop ND filter in Grand Teton National Park.

5) Use a Shutter release remote. These are critical if you are using a shutter speed slower than 30 seconds as you must then turn to bulb mode. But even out of bulb mode, using a shutter release is one more way to eliminate the chances of bumping your frame and increasing sharp focus.  If you don’t have a shutter release you can also use your camera’s timer delay.

6)  Cover your eyepiece viewfinder to prevent light from coming into the frame as this creates undesirable light leaks. My Nikon D810 and D850 have a little door that covers the eyepiece. But otherwise, I would cover it with a black/dark cloth or anything else that will keep the light out. 

7) Check your histogram. Sometimes finding the right exposure with the filter can be a bit of trial and error. Don’t rely on the app or the LCD screen. Make sure the histogram is toward the right without climbing the right wall. If you need to bump exposure, lower that shutter speed, OR if your shutter speed is where you want it for creative effect, raise your ISO or open up your aperture. 

2 minutes with a 10 stop filter at Lake Louise in Alberta, Canada

2 minutes with a 10 stop filter at Lake Louise in Alberta, Canada

8) Consider the creative effect and mood of the image you want to create! When choosing your shutter speed length, think about your creative vision. For really streaked clouds, you may need a 60 second exposure or even a few minutes. If clouds are moving fast, 15-30 seconds may create the look you desire.  With water, you may want to create a really smooth effect with 20-60 seconds or perhaps you want to leave more texture in the water with a 1 second exposure or a fraction of a second.

2.5 seconds in Kauai

2.5 seconds in Kauai

9) Lastly, look at the other areas of your frame. Do you have unwanted blur in other areas of your frame…such as trees, grasses or other foliage?  If so, capture the exact composed frame with a faster speed so you can composite the two images later in post processing. 

3 minute exposure for the sky combined with a fast shutter for the foreground grasses. Shot in the prairie of Illinois.

3 minute exposure for the sky combined with a fast shutter for the foreground grasses. Shot in the prairie of Illinois.

It's a little addicting, so don't say I didn't warn you! Are you looking for filters for long exposure photography? Check out Breakthrough Photography filters!* They are the filters I always have in my bag!

Check out my online workshop, mentoring, or ladies’ landscape photography retreats for educational opportunities.

*Affiliate Link